System Imaging with Apple Software Restore
The History of Apple Software Restore
Before it was rewritten as a command-line utility for Mac OS X, Apple Software Restore originated as a utility for System 7. Apple had commissioned Han Chen & Son Software Consulting Group to write ASR to assist Apple Authorized Service Providers in restoring customers’ Macs with a factory software image. It was first included in the Apple Software Restoration CD - Market Software Series Volume 1. This CD and other ones in the series contained system software restore “bundles” for Macintosh Performa and Macintosh LC computers. Another related CD, the Apple Restoration CD, System Software Disk 1 is more relevant to my interests as it contains model-specific restore bundles for Macintoshes that shipped with System 7.0 and 7.1.
The first incarnation of Apple Software Restore was no more than a modified Apple Software Installer script. The second incarnation, version 1.1 included with the SSW Restoration CD, was a standalone application. Both perform the same function: erasing a user’s disk and restoring it to exactly how it was shipped from the factory.
Versions of ASR prior to 1.3 use Custom Mac Bundles rather than disk images. As ASR was a tool for use only by Apple and Apple-Authorized Service Providers, Apple did not document the format of custom Mac bundles or how to create them. The main structure is a folder with one subfolder and two documents. The name of the enclosing folder is the name of the bundle. The first document is a database of what appears to be a checksums of files in the bundle. It is named (imagename).Database. The second file is a text file describing the bundle, this is displayed to the user when the bundle is selected in ASR. It is named (imagename).ReadMe. The subfolder is the main content of the bundle, any file contained within is copied to the destination. It is named (imagename)·(checksum)·.

The contents of a Custom Mac Bundle
Optionally, there can be another subfolder called Bundle Actions and within it a folder called Post. An application in the Post folder will be run after the restore is complete. The only example I could find was a small application that renamed the destination volume to “Server HD” after the restore completed for a Workgroup Server software bundle.
ASR 1.3 and later use specially-prepared Disk Copy images instead of restore bundles. Restore bundles could still be used, but were deprecated. Further, unlike custom Mac bundles, the creation of disk images for ASR was documented. In 1998 with the release of ASR 1.3, Apple began shipping ASR to users on the Mac OS restore CDs bundled with each new Mac. The user would boot to the CD, launch ASR, select the image, and restore it to their drive.
ASR as it was presented to the user on a software restore CD.
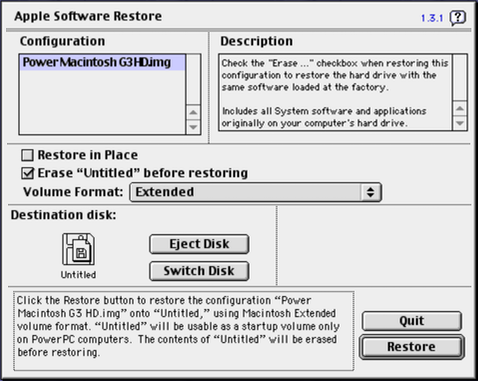
ASR showing the disk image to be restored.
Apple used ASR in their factories to deploy the shipping software image to the hard drive of each Mac that came off the assembly line. Apple continued development and use of ASR for manufacturing, end-user restore CDs, and IT/Computer Lab use into the early Mac OS X era. In fact, because ASR was not yet rewritten for Mac OS X, Apple’s restore CDs continued to boot to Mac OS 9 in order to use ASR to restore images of Mac OS X. This was used until the release of Mac OS X version 10.2 Jaguar, which had a native, command-line version of ASR.
How to use ASR to create and deploy images of Mac OS X
First, a some advice on setting up a workspace. For my system images, I used a Power Mac G4 (Gigabit Ethernet) with dual 500 MHz G4 processors. This model or a Power Mac G4 (Digital Audio) are ideal because they can boot any of the early Mac OS X versions. I strongly recommend having two hard drives installed for performance reasons. The first drive should be partitioned, I set mine up with an 8 GB partition that contains Mac OS 9.2.2 and another 8 GB partition that was used as the source for the disk images. Having a second hard drive can speed up copy operations as the system would be copying between two drives at full speed rather than copying from one part of a drive to another part at half speed or less.
Software required:
- Mac OS 9.1 or later
- Disk Copy 6.5b13 with ImageScan scripts
- ASR 2.2.5 (Macintosh Garden link)
Note: I have used ASR to successfully image Mac OS X 10.0 through 10.2. It should work with 10.3 as well, but I have yet to try it. Do not use ASR 2.2.5 to image Mac OS X 10.4.
First, set up your workspace partition (I call mine Imaging) by installing Mac OS 9 and copying over Disk Copy and ASR. Then reboot and install the version of Mac OS X you want to image to the other partition (I named mine Macintosh HD). Go through the Mac OS X setup assistant and create a temporary user account. Once you reach the desktop, start installing any updates for the version you picked. If you’re using Mac OS X 10.1, do not install the Quicktime 6.3.1 update as it will cause issues later. Then install any applications you want to include in the image. Once you are finished setting up the image with the software and updates you want, reboot and hold down Command+S to boot to single-user mode.
Once in single-user mode, run fsck by entering /sbin/fsck -fy and mount the root filesystem in read/write mode by typing /sbin/mount -uw /. To remove the temporary user account used to install software and updates, delete the NetInfo database with rm -r /var/db/NetInfo/local.nidb. Don’t worry, the NetInfo database will be automatically regenerated at the next boot. Now delete the home folder of the temporary user account with rm -r /Users/<name of the temporary account>. The last step is to trigger the Setup Assistant at the next boot by deleting .AppleSetupDone, do this with rm /var/db/.AppleSetupDone. Upon reboot, the welcome video will play and the setup assistant will launch again.
This is all that is necessary to prepare Mac OS X for imaging. I go a bit further and delete caches, preferences, the swap file, and anything else that indicates the installation has been used before. As this is tedious, I will document it later.
Now, reboot to your Imaging partition with Mac OS 9. Run Disk First Aid on your Mac OS X partition. Then open Disk Copy 6.5b13 and select Image -> Create Image From Folder and select your Mac OS X partition.
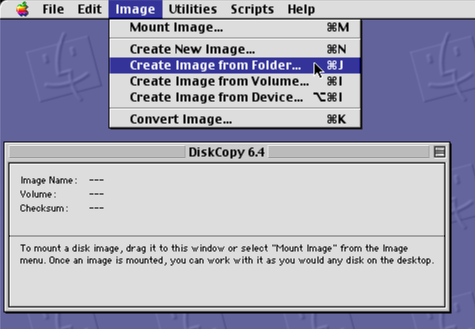
Create Image From Folder
Disk Copy will take a bit to calculate the size of the image. In the next dialog, select Read/Write as the disk image format. De-select Mount Image and save the image to the second hard drive in your system (I call mine Data). Again, I recommend using two drives because a file-by-file copy from one drive to another takes significantly less time than a file-by-file copy from one partition to another on the same drive. While you can skip ahead and select Read-Only Compressed at this stage, it takes a very long time to compress the image. Additionally, if the image is over 1 GB, it will usually error out at the conversion stage and you will have to create the image all over again.
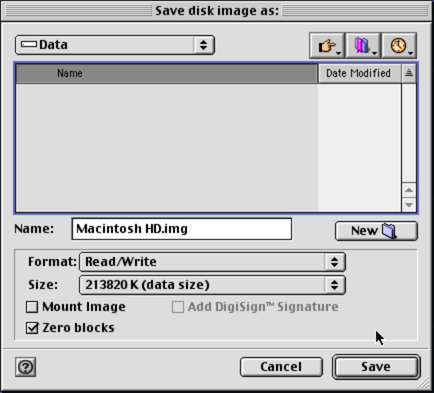
Save Disk Image As:
Disk images under 1 GB will be saved as a Disk Copy 6 NDIF image. Disk images over 1 GB will be split into 1 GB segments and will be UDIF images. While Mac OS 9.1 and later support files larger than 2 GB, AppleShare does not. So I keep my image segments at 1 GB for simplicity. Select Image -> Convert Image from Disk Copy’s menu and convert the image to Read-Only Compressed. Save the image. This will take a long time. At this stage, images over 1 GB will compress without issue, but will still be segmented.
Once the conversion is complete, select Scripts -> Scan X-only Image for ASR from Disk Copy’s menu. If your disk image contains Mac OS 9 in addition to Mac OS X or just Mac OS 9 only, select Scan X+9 Image for ASR from the menu instead. Select your compressed image from the dialog. This will also take some time, but not nearly as long as the image compression. In this step, a checksum of the disk image is computed and added to the resource fork of the disk image.
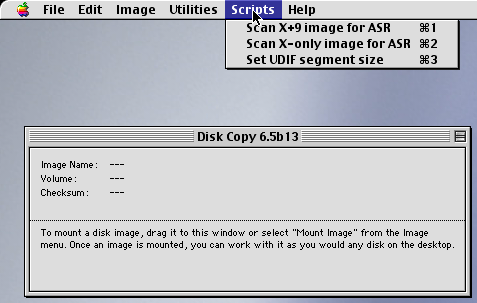
Disk Copy’s Scan Image for ASR menu
At this point, your disk image is ready to be deployed with ASR.
Setting up ASR to deploy images
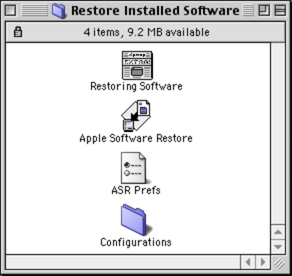
Rename your disk image to remove .img or .dmg from the file name of the image and all of its segments. This is not required, but it shortens the file names and makes the list of images more presentable in ASR. Put your disk image and segments into a folder called Configurations. Put this Configurations folder alongside Apple Software Restore and ASR Prefs. Optionally, create a readme for your disk image describing its contents and place it in the Configurations folder. Name it the same as your image, but with the .readme extension, so (imagename).readme. ASR will show this description when you select the image from the list. Optionally, you can place Startup Disk 9.2.3 and SetVolCreationDate into Configurations:Actions:Post folder to have them run after the image is restored. Startup Disk 9.2.3 will set the target disk as the startup disk on next boot and SetVolCreationDate will set the target disk’s creation date to the current date and time. SetVolCreationDate is only important if you use Macintosh Manager.
Open ASR and you will see your newly-created image in the list on the left and the description you wrote on the right (if you made one). Click Restore and the image will be restored to the selected disk and the Post actions ran (if you made any).
To make deploying images easy, I have ASR and my images stored on an AFP share. That way, I can simply NetBoot a Mac to Mac OS 9, mount the share, and restore an image. That, or I could also boot using a Mac OS 9 install CD, mount the share, and restore an image.